
How to Build a Home Climbing Wall
Building a Home Rock Climbing Wall
Having your own home climbing wall is the fastest way to improve your rock climbing. You can see phenomenal improvement in your climbing skills with consistent climbing, and nothing is more convenient for your training than having a climbing wall at your house.
Climbing walls vary in size, height, and structural requirements. This is not a step-by-step guide to building your climbing wall, but this page can give you an idea of what is required and how to get there. If you ever have more in-depth questions, I'd recommend consulting a structural engineer or contractor.
Step #1: Where Will You Build the Climbing Wall?

This will very much depend on what you have to work with and any available space. Take into consideration how tall you want the climbing wall to be and how wide you would like to build it. The most common places are garages, shop buildings, and basements. If you live in dry climates, an outdoor space could be a great option.
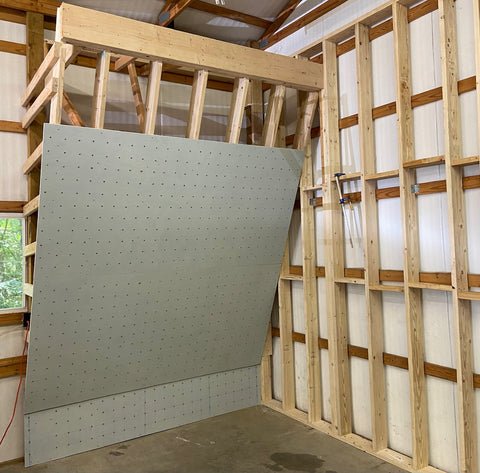
When I set out to build our home climbing wall, I selected the back corner or a large shop building. This is ideal as the climbing walls could go relatively high and we were not restricted by plumbing pipes or garage doors.
Selecting an area in a corner can be preferable as it is easier to tie your climbing wall into two structural walls - which increases the strength of the wall and give you an option for dihedral climbing routes.
Basements and garages can be great options as you may have unused space in those spots. The downside is you may have limited height to work with, but you can make the most of it!
|
Please Read: Please consider purchasing directly from our website. We would love to make your next set of climbing holds and by purchasing directly us we can bring you the holds at the lowest price. We are sincerely grateful for your support of our small business! We offer free shipping to the lower 48 states on all orders over $49 and there is no sales tax charged (unless you are in Missouri). |
Step #2: Designing Your Home Climbing Wall
Unless you have a background in construction and/or engineering, you may want to start with a simple climbing wall, consisting of one continuous angle. This will also be where you take into consideration who will be climbing this wall.
For Kids: Unless you have a child prodigy on your hands, the most popular climbing wall for kids is a straight vertical wall. This lets kids play around on big and little holds as they start to become accustomed to the sport of climbing. This is also the easiest and fastest wall to build. Here is a kid's climbing wall (with a killer paint job) sent in by one of our customers:

For Adult Climbers: The vast majority of adult climbers are looking to build a home climbing wall for one reason - to get strong! This is quite attainable and you don't need a huge climbing wall to do it.
Adult climbers will need to consider what angle they want to build their climbing wall at. The steeper the angle, the harder the climbing. Also, with steeper walls, you will need more climbing jugs (and fewer crimps).
My recommendation would be to go no less than 20° overhang. Anything less than that and you might get bored quickly. You will have much hard potential, and get stronger quicker, on steeper walls.
| Popular Climbing Holds for Kids | Best Selling Climbing Grips (Adults or Kids) |
 |
 |
If you are already an experienced climber, the go-to climbing angle is 45° overhang. This is forearm swelling and heart-pumping power endurance at its finest. Most home walls that you see on Instagram or youtube featuring high-level rock climbers will be this angle. One of my walls is a 45° wall and I am, quite admittedly, not strong enough to only climb on it. It is a great mix for me and it has definitely increased my strength, I'm just not at a level that I could exclusively climb on it (I am a V4-V5 boulderer).
If you are a novice climber, a 20-25° angle will be challenging but enable you to make gains faster. From personal experience, one of my home climbing walls is at a 22° angle and it is the one I climb on the most. It is also perfect when friends come over to climb that are newcomers to rock climbing. I can set juggier climbing problems for them and we can all have fun on the same wall.
Another thing to consider is that you can buy or build climbing volumes in order to make a climbing wall either easier or more difficult. Adding a climbing volume to a 45° wall could enable you to use a smaller handhold than what you might normally require.
Step #3: Building your Home Climbing Wall
While this might be the hardest step, don't let it intimidate you. There are plenty of online resources that can help guide you. If you aren't comfortable doing it yourself, hire someone! Here are some basic considerations.

Building Materials:
- Wood framing studs. Framing studs will run vertically every 16"-24" behind your walls. The size of stud you will need will depend on your climbing angle. Selecting the right stud is VITAL to the structural integrity of your climbing wall. Consults a span calculator (or a professional) to get the right size lumber for your space. If in doubt, go bigger and "over-build." Nobody ever complained about a climbing wall that was too strong.
- Plywood. It will save you time by designing your space around the size of 3/4" ACX plywood - 4' x 8'. Having a climbing wall that is 8 feet wide will give you plenty of room to set a multitude of bouldering problems. You must use 3/4", anything thinner will have durability issues down the road.
- Construction Hardware. This will be your self-drilling construction/decking screws and nails (I used 16d nails with a nail gun). If you are going into concrete, you will need masonry expansion anchors. Joist hangers and framing connectors are another consideration, depending on how you will build your structure.
- Climbing Wall T-Nuts. Most climbing home walls will use the inexpensive 4-prong t-nut (3/8" x 16 (7/16" barrel length). These are designed for 3/4" plywood and will be what your climbing bolts screw into. We would be happy to supply these for your wall and our prices are extremely competitive.
- Tools. This is not a comprehensive list but the following will be where I would start: tape measure, framing square (s), levels, pencils, hammer, stud finder, circular saw/miter saw/ table saw, impact drill, drill bits, jigsaw, safety glasses, and gloves, saw horses, clamps, and more.
Step #4: Construction
Let's get to work! Gather your handyman friends and get to building. Each climbing wall will be different, but to put it simplify the process; you will need to build a solid frame (and kicker), secure it to the floor, secure it to an existing wall, and anchor it into a header (or build a header as you can see that is what I had to do).
REI has an informative page on constructing a wall that will go into further detail than we do here on the actual construction of the framework.
For the plywood sheets, you will want to decide whether to paint the plywood or leave them raw.
Advantages to painting your climbing walls:
- It gives it character and aesthetics (it looks awesome)
- You can add grit to the paint to increase friction (smearing with your feet)
- It helps keep climbing holds from spinning
Disadvantages to painting your climbing walls:
- It takes longer to prep
- It will cost more
It is up to your which way you go, I would make this decision before drilling your holds - it will save time. I chose to paint my walls, which has led to fun color patterns and I rarely have a climbing hold spin. Which leads to drilling holes for your t-nuts. You will need a 7/16" forstner bit (a spade bit works but will tear the plywood), pro-tip, and angle drill guide. You can pick these up fairly inexpensively and they will ensure all your holes are straight! For more information on this, visit our page on how to drill holes for a climbing wall.
Decide the spacing you want your holes to be apart and mark them. I would clamp up to 3 plywood sheets together and drill them all at once to save time. After that, clean the wood up and start installing your t-nuts on the back side of the wall. Once the walls have holes and t-nuts, use construction/decking screws to attach to your framing.
Step #5: Buying Rock Climbing Holds
We cover this more in our article on how to buy your first set of climbing holds, but here is a quick summary.
In the end, after the wall is built, the items you will interact with the most are your rock climbing holds. While we are quite biased and would love for you to buy all your climbing holds from us, there are admittingly a ton of great options out there. We pride ourselves in making high-quality holds for a very affordable price. I believe if you compare our prices to the big brands you will see just how affordable we are! We strive to keep overhead as low as possible and stick to the basics of making fun and engaging climbing holds for home wallers.
How many climbing holds will your need? Roughly 30-40 holds per sheet of plywood is a nice and easy standard to go by. You will probably start at less than that but you can gradually work your way up to that.
My biggest suggestion is you won't have room for the super large holds you see at a climbing gym or climbing competitions. Remember, they have plenty of room and you will be limited on space! Small, medium, and large holds are perfect for home climbing walls (in my opinion).
On our home climbing wall, I ended up with a vertical wall, 22° overhang, and 45° overhang. I also added a hand crack right in the middle of the wall. You are only limited by your imagination and construction skills!
If you have questions, Contact Us and we are happy to help. If you are in the process of building a home climbing wall, we would love to help supply your climbing holds. You can support us by buying our high-quality climbing holds here.

Disclaimer: Rock climbing is inherently dangerous, so please do so at your own risk. Any information you read here is only a suggestion. You are the person responsible for creating a safe climbing wall for you and anyone using it. We are not responsible for any injuries or complications caused by using our products.